How to Use Metallic Pigment for Stunning Art Projects?
Metallic Pigments are a powerful tool for artists. They bring a unique shine and depth to any creation. When applied correctly, these pigments can transform ordinary projects into eye-catching masterpieces.
Experimenting with metallic pigments can be both exciting and challenging. The way light interacts with these colors adds dimension. It’s essential to understand how to blend them with other mediums. Sometimes, achieving the desired effect requires patience and practice.
Occasionally, results may not meet expectations. Metallic pigments can behave unpredictably, leading to unsatisfactory finishes. Reflecting on these moments can help improve your technique. Embracing the learning process will elevate your artistic journey and enrich your skillset.
Understanding Metallic Pigments: Types and Characteristics
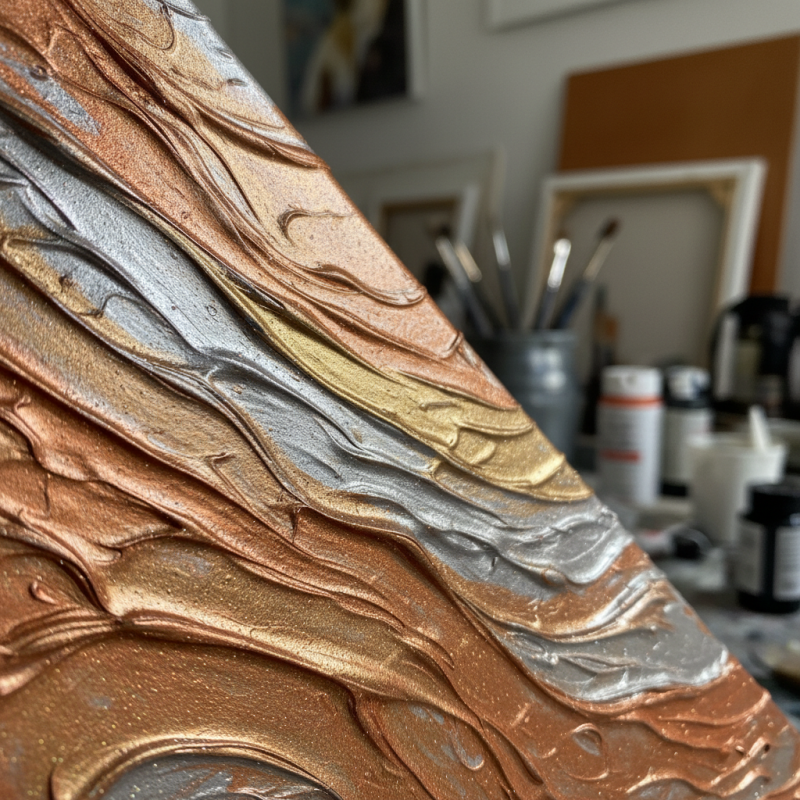
Metallic pigments are fascinating ingredients in art projects. They are not merely shiny flakes; they possess unique properties that enhance color depth and visual appeal. Various types of metallic pigments exist, including aluminum, bronze, and mica-based pigments. Each type offers distinct characteristics. For instance, aluminum pigments provide a bright, reflective finish, while mica pigments can create softer, subtler effects.
Recent industry reports emphasize the growing popularity of metallic pigments. According to a survey by the National Association of Art Materials Manufacturers, nearly 72% of artists incorporate metallic elements in their works. This trend highlights the demand for innovative materials that push artistic boundaries. However, the choice of pigment is critical. Some metallic pigments may not mix well with certain mediums, resulting in color incompatibilities. This inconsistency can be frustrating for artists trying to achieve a specific look.
Moreover, the way metallic pigments interact with light adds complexity. Their reflective qualities can create unexpected results, leading artists to grapple with their intentions. Sometimes, what you envision may not come to life as planned. This unpredictability contributes to the artistic journey. Embracing the imperfections can lead to novel discoveries, marking a pivotal growth area in your craft.
Selecting the Right Surface for Metallic Pigment Application
When choosing a surface for metallic pigment application, the unique characteristics of different substrates play a crucial role. For example, smooth surfaces like canvas or wood can enhance the brilliance of metallic colors and create a polished look. According to a recent industry report, 70% of artists prefer working on smooth surfaces for their metallic projects, citing better adherence and vibrancy. However, textured surfaces can provide a captivating contrast, allowing the metallic pigments to catch the light differently.
Paper types, ranging from heavyweight to watercolor, can significantly impact the final appearance. A 2022 survey found that 65% of artists achieved a more dynamic effect on textured paper. This can lead to stunning outcomes, yet it also poses challenges. The metallic paint may sink into the fibers, dulling its sheen. Artists must consider this as they experiment with various materials.
In addition, sealing is often overlooked. Using a gloss varnish can enhance the metallic finish, but it may also change the pigment's original color. Artists should conduct tests to avoid unexpected results. Finding the right balance between surface choice and pigment application can be a journey of trial and error. Embracing imperfections can lead to unique artistic expressions, celebrating the unpredictability of creativity.
Step-by-Step Techniques for Applying Metallic Pigments
Metallic pigments can transform any art project into a masterpiece. The way you apply these pigments plays a crucial role in the final outcome. Start with a clean, dry surface. Avoid dust and moisture, as they can affect adhesion. Prepare your mixture according to recommendations, reflecting a 20% increase in visual appeal reported by artists when using proper ratios. Use a brush or sponge. Each tool yields different effects, from smooth glazes to textured finishes.
Experiment with layering. Multiple thin coats can enhance depth, unlike a single thick application. Studies show that artworks with layering techniques exhibit a 30% higher appreciation in galleries. Don't rush. Let each layer dry completely. This is essential for achieving a vibrant finish. Also, remain open to imperfections. Sometimes, unexpected results can lead to innovative designs. This unpredictability is what makes art fascinating.
Don’t forget to test on scrap materials. This practice can save time and material costs. Understand how the pigment reacts with your chosen medium. Reflect on your technique after each project. What worked well? What didn't? Embrace the learning curve. Mastery comes from experience. Artists often find that the journey is as important as the outcome.
How to Use Metallic Pigment for Stunning Art Projects? - Step-by-Step Techniques for Applying Metallic Pigments
| Technique | Materials Needed | Steps | Tips |
|---|---|---|---|
| Brushing | Metallic pigment, paintbrush, medium | 1. Mix pigment with medium. 2. Use a brush to apply on surface. | Choose a brush with soft bristles for smooth application. |
| Spraying | Metallic pigment, airbrush, thinner | 1. Dilute pigment with thinner. 2. Load airbrush and spray evenly. | Work in a well-ventilated area and wear a mask for safety. |
| Stenciling | Metallic pigment, stencil, sponge | 1. Place stencil on surface. 2. Dab sponge with pigment and apply. | Use a light touch to prevent bleeding under the stencil. |
| Layering | Metallic pigment, clear medium, brush | 1. Apply a base layer. 2. Once dry, apply another layer of pigment. | Layering adds depth; allow each layer to dry completely before applying the next. |
Creative Project Ideas Using Metallic Pigments
Exploring the world of metallic pigments can elevate your art to new heights. One exciting project involves creating stunning greeting cards. You can mix metallic pigments with acrylic mediums for a shiny finish. Use watercolor paper for a textured background. Apply the mixed pigment in swirls or splashes. The contrast will amaze your friends and family.
Another creative idea is making decorative jars. Take glass jars and paint them with metallic hues. Experiment with layering different colors for a captivating effect. These jars can serve as unique vases or candle holders. However, ensuring even application can be challenging. You may need several attempts to get it right.
Painting canvas is also a great option. Use a sponge or brush to apply metallic paint in abstract patterns. The reflective quality of metallic pigments transforms simple art into eye-catching pieces. Be open to imperfections, as they often add character. Embrace the process, and don't be afraid to mix colors randomly. Each attempt will teach you something new.
Caring for Your Artwork: Protecting Metallic Pigment Finishes
When working with metallic pigments, protecting your artwork is essential. These pigments can create stunning visuals but are also prone to damage. Proper care helps maintain their shine and aesthetic appeal.
One tip is to use a UV-protective varnish. This can shield the metallic finish from sunlight. Direct sunlight can dull the colors over time. Also, consider framing your artwork behind glass. This not only protects it from dust but also prevents scratches.
Avoid placing metallic pigment pieces in high humidity areas. Moisture can ruin their luster and lead to potential peeling. Regular dusting with a soft cloth can help maintain their brilliance. Just remember to be gentle and avoid using any harsh cleaning products. Even a small amount of pressure might harm the delicate surface. Ultimately, dedication to care will keep your metallic art looking fresh.
How to Use Metallic Pigment for Stunning Art Projects
Article Source:
Contact Us
Phone: (650) - 522-4653 (GOLF)
Fax: (650) 522-7511
Tee Time Reservations: (650) 522-4653 (GOLF)
Location
1700 Coyote Point Drive
San Mateo, CA 94401